Golf is a sport that requires precision and accuracy, and the key to a successful shot lies in the body movement during the swing. In a golf swing, every aspect of your body movement plays a crucial role in determining the outcome of your shot.
This article will guide you through a step-by-step process of perfecting your body movement in a golf swing, covering every aspect from head to toe. By following these instructions, you can refine your swing and take your golf game to the next level. So, let’s take it from the top and work our way down as we investigate the ideal golf swing body motion.
Perfect Body Movement in a Golf Swing: Step-by-Step
The golf swing basics involve winding and unwinding the body and swinging the golf club in a circular motion. Perfect body movement is essential if you want to succeed with your swing. So we will tell you exactly how the body movement works to make the perfect swing.
Start in a good address position to get your body movement started. To begin the takeaway, draw your left shoulder under your chin and shift your weight to your right side. Turn your shoulders as much as possible until they turn 90 degrees. Move your hands and arms up to the top of the backswing simultaneously.
When you reach the top of the backswing, you should feel quite loaded and tight because you’ve turned the spring and wound the upper and lower body against each other to make power. From here, the downswing starts; the lower body drives the swing while the front hip moves across and rotates back. As the lower body pushes off the ground, the hip will turn, the chest and head will turn to the left, and the body weight will move to the front leg. Then the hands and arms can come through, releasing the club with a wide finish position.
Focus more on how your body moves and makes power during the swing than on what your hands and arms are doing. You can generate greater power in your golf swing by relying less on your hands and arms and more on the rest of your body.
It may look easy, but it requires precision and the correct body position of each body part. So let’s talk about how each body part works and where it needs to be during the golf swing.
Head Positioning During Golf Swing
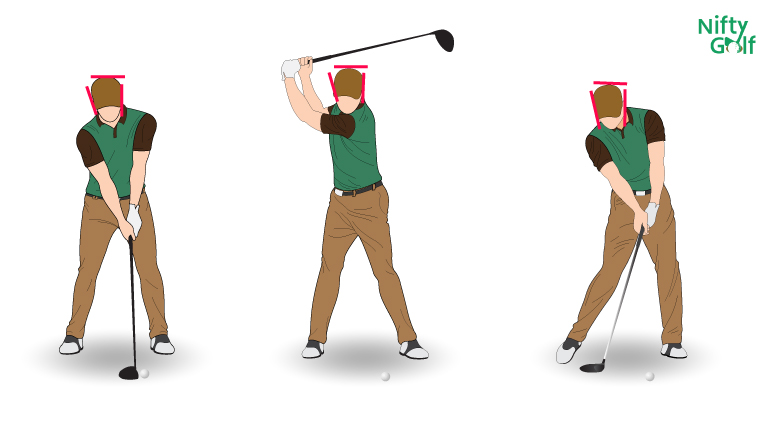
Skilled golfers maintain their heads still from address till impact, even though it may appear opposite to the untrained eye. Head positioning in the golf swing can significantly affect your shot accuracy. Here are the key steps for proper head positioning during the backswing, downswing, and follow-through:
Head Movement In Backswing
- In the backswing, start by standing up straight with your head held high and your eyes straight ahead.
- Turn your shoulder to the right by allowing it to rotate.
- Looking from the front, the left ear should be more visible than the right.
- It is essential to keep the chin high to provide the left shoulder room to turn beneath.
Many golfers look at the ball so hard that their heads and chin drop, which makes it hard to turn entirely. Instead, the head should stay still and remain behind the ball during the backswing, promoting a consistent swing path and improving ball striking.
Head movement in the downswing & Follow-through
- During the downswing, keep your head steady and maintain good posture and balance.
- After impact, the head should turn and follow the golf balls path to keep a smooth, fluid swing.
- You’ll land on your left side with your head following the rest of your body.
- After your follow-through, hold your finish and stay in your posture for a few seconds, which will help you reinforce good form and build muscle memory.
When swinging a golf club, too much head movement during the downswing can throw off the body’s alignment, leading to an erratic swing. Instead, keep your eyes on the ball and don’t move your head until you’ve hit it. It will help you keep the correct posture and keep your head steady.
And in follow-through, One common mistake is tilting your head too early, which can cause you to lose your balance and direction.
Shoulder positioning in golf swing
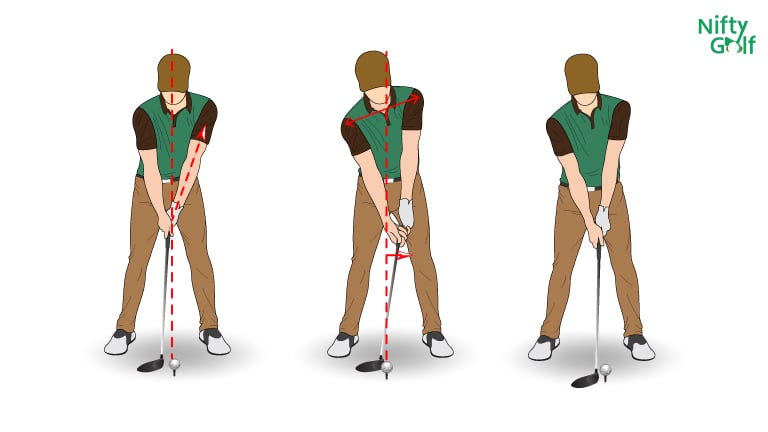
To improve ball striking, you must focus on the shoulders, which rotate the body in the golf swing. A solid shoulder turn will give you more strength and consistency. First, we’ll go through where your shoulders should be in the swing sequence so that you can understand how the shoulders move in each step.
Shoulder movement in backswing
- The lead shoulder should drop at the top of the backswing, and the upper body should rotate nearly 90 degrees from the target.
- Your lead shoulder will be lower than your trailing shoulder, causing your chest to rotate opposite your target.
- You can tell you’ve done a full shoulder turn when your lead shoulder is under your chin.
One common mistake golfers make in shoulder positioning during the backswing is allowing their shoulders to tilt too much, which causes the golfer to take the club too far inside the target line, resulting in a steep downswing, inconsistent ball contact, and a loss of power.
And don’t lift your arms too high on the backswing because that makes your shoulders turn too much. This can make you swing too high, leading to a slice or a pull.
Shoulder movement in downswing
- To initiate the downswing, the trail shoulder should drop.
- By doing this, your chest will face the ball, and your shoulder line will be parallel to the target line.
- The shoulders should parallel the target line at impact to square the club face and hit a straight shot.
You should keep your shoulders fully rotated through the backswing and into the downswing. In addition to ensuring the clubhead enters at the proper angle, this will also help generate more power.
Shoulder movement in follow-through
- In the follow-through, you’ll want to give your swing a strong finish by turning your shoulders around until they stop just past your target line.
- It is essential to keep rotating the club after the moment of impact to optimize its velocity when it meets the ball without pulling away from the shot.
- Your chest should face your target at the end of your swing, indicating that your whole body is in the shot.
Don’t over-rotate shoulders during the follow-through, which can lead to an incorrect swing path and a loss of accuracy. So you have to maintain a balanced follow-through and avoid excessive shoulder twisting.
Arms movement in golf swing
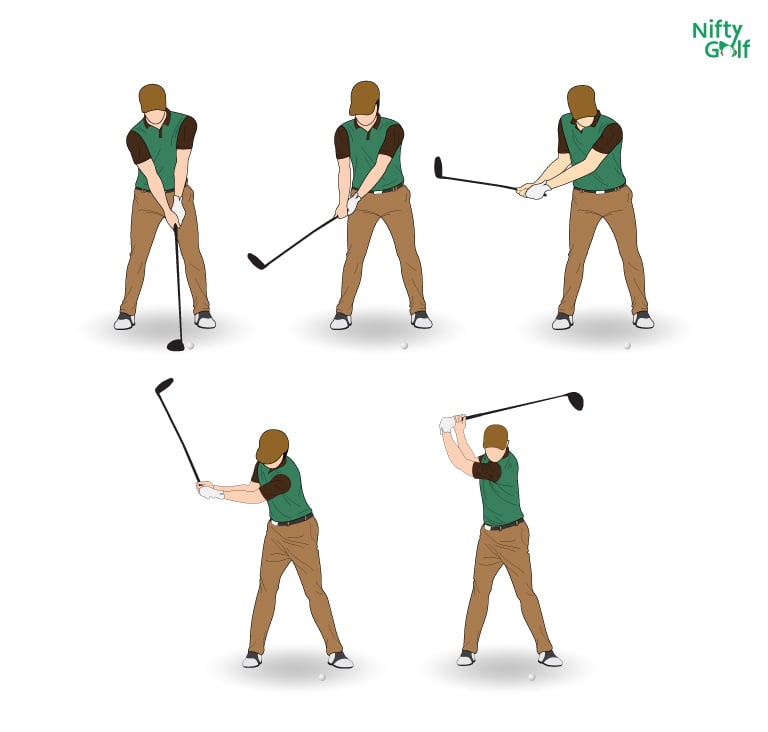
From the grip on the club to the follow-through, each aspect of the swing can impact the trajectory and distance of the ball. However, one area of focus that many golfers overlook is the movement of their arms during the swing. Although it may seem like a small detail, the positioning and movement of the arms can play a significant role in the quality of the shot. So here we will discuss the arms movement throughout the swing.
Arms movement in backswing
- During the first part of the backswing, keep your right arm pretty straight to promote width and good speed.
- Instead of using your hands to start the backswing, use your shoulders and core to complete the rotation.
- As you swing back, keep your right arm on your left arm.
- As the backswing goes on, the right arm should start to fold and move under the left arm.
- When you do this, your upper body will coil more efficiently, and your wrists will set and load properly.
Arms movement in downswing
- During the downswing, the left arm should be primarily straight and connected to the right arm in a “v” shape. This will help maintain the swing’s balance and keep it from becoming unstable.
- As you turn to the front, your left arm may be higher than your right.
- Simply put, the downswings start with the hips and move left-to-right, starting with the left shoulder, then the right shoulder, left hip, right hip, left arm, and right arm.
In a downswing, the common mistake is to allow the left arm to move away from the body, which can throw off the swing’s plane. Having the arms rather than the shoulders start the downswing can also reduce the shot’s speed, angle, and accuracy. Keeping the left arm straight can only be possible if the shoulders lead the downswing. When this happens, the player’s shots become less consistent.
Arms movement in contact
- For the swing to work as it should, your arms must return to where they were at the address.
- During contact, the left arm helps guide the club.
- When the club hits the ball, the right arm moves the club through the ball.
- The right arm pulls the club through the swing and pushes it through impact.
- During the downswing and impact, the left arm stays straight and acts as a guide.
One of the biggest mistakes is bending the left arm at impact, which can make the ball go off-center, land in the grass, or hit to the right or left. Another common problem is the “chicken wing,” which happens when the left arm bends at impact, making it hard to release the ball entirely and putting less force into it.
Arms movement in follow-through
- With both hands still on the grip, the club should end up on the left shoulder.
- When you hit the ball, the force should push the clubhead toward your left shoulder.
- During the follow-through, the right-hand keeps pushing the clubhead through and up.
- And the left hand keep the club on track.
When you follow through completely, you guarantee that the club head will stay on target and the ball will be struck cleanly. But if you stop your arm movement too soon, you may need more clubhead speed and distance.
Wrist positioning in golf swing
A golfer’s ability to control their shots’ distance and direction relies heavily on their wrists’ motion during the swing. Proper wrist motion makes getting the ball into the hole easier for a golfer. So here, you will get an idea of how your wrist works in the golf swing.
Wrist movement in backswing
- At the beginning of the backswing, hinge your wrists so that your left forearm is parallel to the club’s shaft.
- Try to maintain your wrists at an angle as you swing back.
- When you’re at the top of your backswing, your wrists should be fully hinged, with your left wrist flat and your right wrist cupped.
- It’s essential to get the position of your wrists at the top of your backswing right because it will affect the direction and path of your downswing.
- Hinge your wrists slightly as you bring the club back during the backswing. It will help you create a wider swing arc and generate more power.
- As you approach the top of your backswing, make sure your wrists are still hinged but not excessively. At the top of your backswing, your lead arm and the club shaft should be in a straight line.
Setting the wrists too early or cocking them excessively at the top is a common mistake in wrist movement. So to avoid this, keep your wrists relaxed, maintain a smooth and consistent hinge, and swing your arms back fully to achieve a full backswing.
Wrist movement in downswing
- Start the downswing by letting your hands fall naturally.
- Your left wrist should still be at a nearly 90-degree angle to the club shaft as you approach the top of your downswing.
- As your downswing progresses, your arms should naturally unhinge at the wrists.
- Just before impact, release your wrists slightly to help you square the clubface and make solid contact with the ball.
- Try to keep your left wrist level and your right wrist slightly cupped and angled away from the target at impact.
- If you want to make good contact with the ball every time you swing, you must ensure your left arm is fully extended, which means your left wrist is flat.
- After impact, allow your wrists to release naturally as you follow through.
During the downswing, one common mistake is to release the angle between the wrists and the club too early, which reduces power and accuracy. You should keep your wrists at a 90-degree angle for as long as possible. Another common mistake is flipping the wrists at impact, which results in inconsistent ball striking and poor control. Keep your hands ahead of the ball at impact, and keep your left wrist firm throughout the swing.
Wrist movement in follow-through
- During the follow-through, the wrists should continue to hinge and unhinge naturally.
- Let the wrists relax naturally after a hit without trying to move them.
- Keep a firm grip on the club throughout the follow-through to keep control and stability.
- The lead wrist should stay flat and firm during the follow-through, while the trail wrist should naturally hinge and release.
One mistake in the follow-through is stopping their swing suddenly after impact instead of going to the end. No matter how skilled you are, you can lose power and control and keep your wrists from releasing correctly if you don’t finish the follow-through. So instead, follow through with a loose and natural wrist motion, which will help golfers of all skill levels.
Spine angle in golf swing
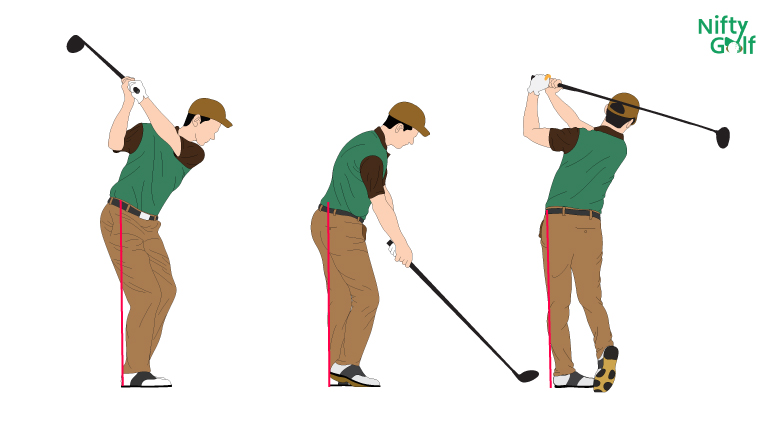
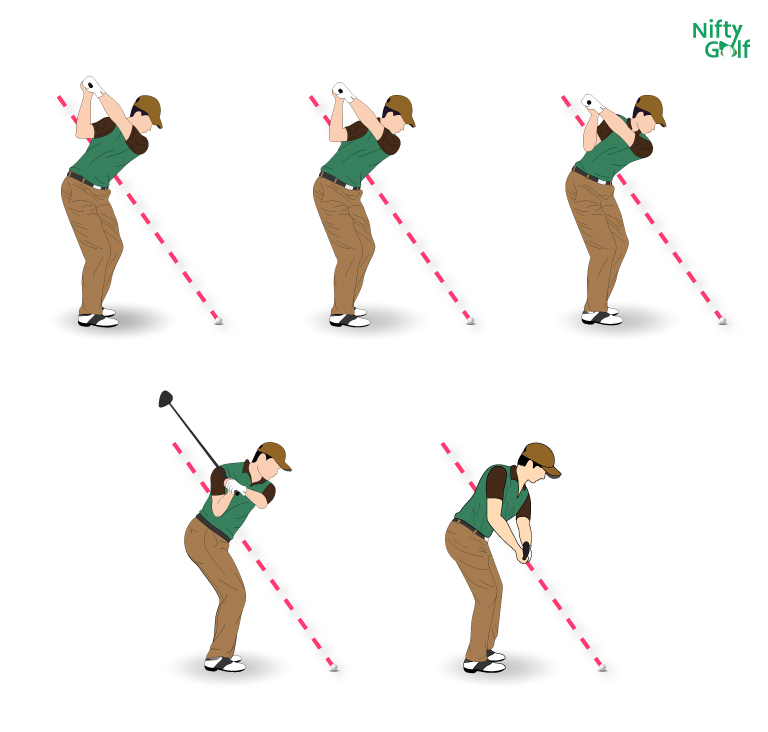
Keeping your spine at the right angle is important because it lets you move your body smoothly and naturally. Spine angle has two significant effects on the golf swing. The first is how well you hit the ball every time, and the second is how long and strong your swing is. Your golf game will only improve if you have the correct spine angle.
It is essential to keep the angle of the spine towards the ground throughout the entire address, top of the backswing, impact, and finish phases of the golf swing.
The ideal spine angle will change based on the player’s build, swing, and club type. For example, the spine angle of a driver might be tilted more away from the target, while the spine angle of a wedge could be slightly more straight up.
One common mistake during the swing is hunching or leaning forward, which puts too much stress on the spine, causing pain and long-term damage. So you have to maintain your spine angle throughout the swing.
Hips movement in golf swing
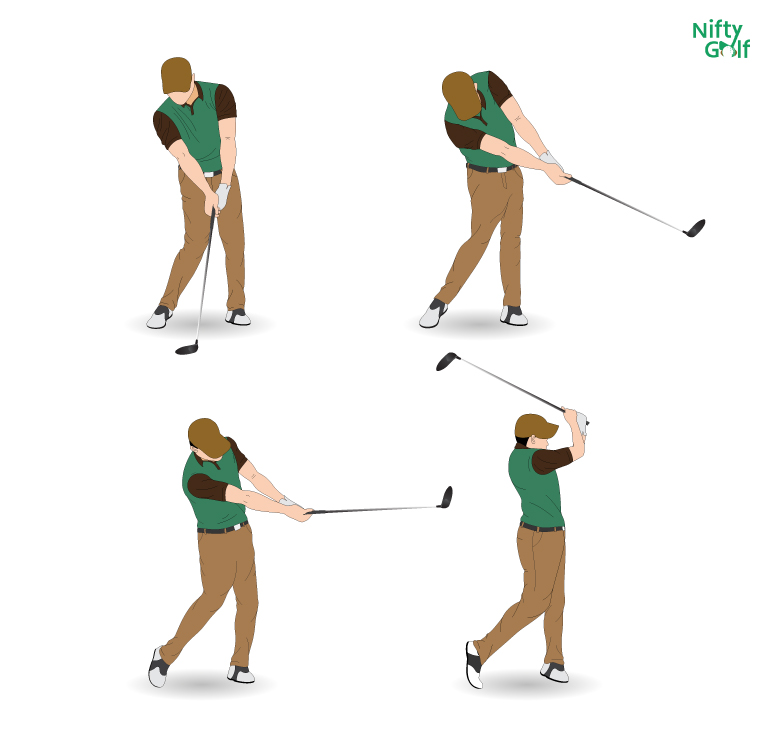
Hips are crucial in the golf swing and affect how you hit the ball. The key to a successful golf swing is getting your whole body to move as one, which involves ideal posture, hand, wrist, and hip placement. Yet, most amateur golfers tend to ignore the importance of hip training. Properly using your hips provides energy in your golf swing. So here we will tell you how the hips move throughout the golf swing.
Hips movement in backswing
- During the backswing, the hips should turn away from the target.
- Keep the weight balanced on the inside of the back foot.
- The hips should turn approximately 45 degrees from their starting position.
- Focus on turning the hips while maintaining a stable lower body.
The hip movement has many common mistakes, such as swaying, sliding, and not turning. Hips sway when they move laterally or side to side rather than rotate around a central point. If you do this, you could lose your balance and have less strength to put into the club.
When the hips go too far back during the backswing, a sliding motion develops, which results in weaker swings and less consistency. You need to rotate your hips fully during the backswing; otherwise, you risk putting unnecessary pressure on your lower back and limiting its ability to produce power and make a full turn.
Hips movement in downswing
- The downswing starts with a lateral shift of the hips toward the target.
- The hips should rotate smoothly and gradually towards the target, initiated by the lower body, not the arms or upper body.
- As the hips turn in the direction of the goal, the weight should shift from the back foot to the front foot.
- The hips should be fully rotated towards the target when the club reaches waist height.
- This hip rotation creates a “torque” effect that generates power and clubhead speed.
Early Hip Extension is a common mistake when the golfer’s hips move toward the ball before impact, which causes the golfer to lose their posture. You can fix this mistake by maintaining good posture, shifting your weight appropriately during the swing, and practicing golf-specific exercises that improve your hip rotation and weight shift.
Hips Movement in follow-through:
- After impact, the hips should continue to rotate toward the target.
- The rotation of the hips helps to prevent injury and maintain balance.
- The follow-through should naturally continue the swing motion, with the hips rotating smoothly and gradually toward the target.
You could lose power and accuracy if you don’t finish the rotation during the follow-through. So you must keep your balance and move your weight properly during the follow-through. You can achieve this by distributing your weight evenly on your front foot and maintaining a smooth, even motion in your hips.
Legs Movement in golf swing
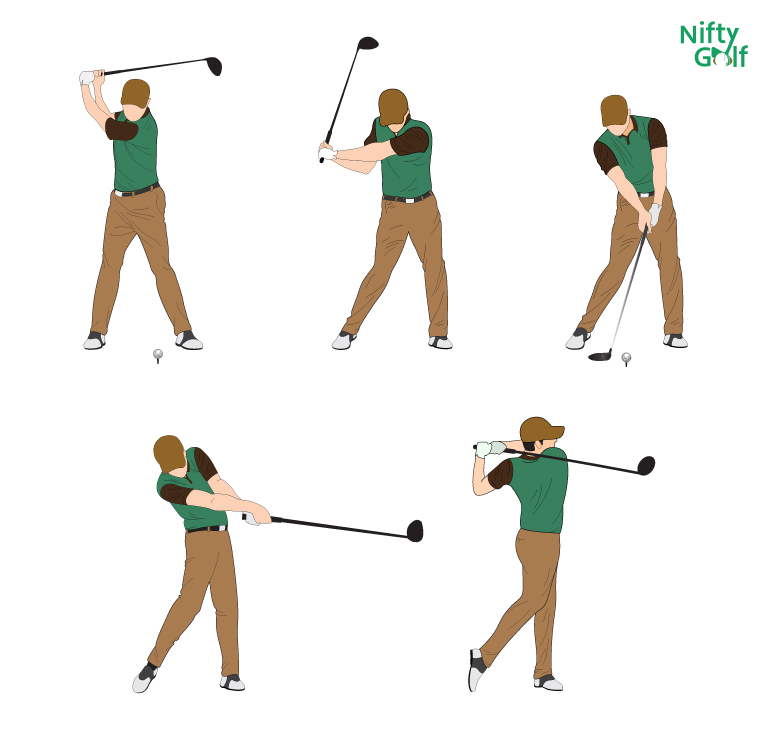
Perfecting your golf swing by utilizing your legs is a skill that deserves your time and attention. This is because the legs do most of the work in a golf swing while the arms and trunk follow their lead.
Ensure your legs are in the right place before, during, and after your golf swing to unleash the power you didn’t know you had. As a result, golf swings will become more fluid, natural, relaxed, and controllable. Here, we’ll explain the role of the legs in the various phases of a golf swing.
Legs movement in backswing
- Begin your backswing, and shift your weight to your back foot while flexing your lead leg.
- Use your lead leg as an anchor point to help stabilize your swing and maintain your balance.
- As you approach the top of your backswing, let your trail leg straighten slightly and turn your hips and shoulders entirely. At the end of the backswing, turn your shoulders and torso away from the target while shifting all your weight onto your back foot.
Allowing the knees to sway or move too much during the backswing is a typical error that can cause the golfer to lose balance and stability. Keeping the knees still and the weight transferred evenly between the feet during the backswing can help prevent this.
Legs movement in downswing
- As you start the downswing, push off your back foot to move your weight back to your front foot.
- Start to turn your hips toward the target, which will move your weight to your front foot.
- Let your back knee bend slightly as you turn your hips toward the target.
- As you turn your hips, your back foot will stay on the ground, and your toes will start to turn a little outward.
- Your back leg will start straightening and moving toward the target as your hips and torso rotate.
- Before you hit the ball, you should put all your weight on your front foot and almost fully extend your back leg.
- Your back foot will be on its toes, and your heel will point away from the target, which will help you keep your balance and finish your follow-through.
One common mistake during a downswing is taking the weight off the front foot too soon that will reduce your swing’s accuracy. Another common mistake is putting too much weight on the back leg during the downswing, which can lead to a loss of balance and a missed shot. Instead, move your weight smoothly from your back to your front foot.
Legs movement in follow-through
- Start by turning your hips toward the goal and reaching your arms as far as possible toward the ball.
- Move your weight to your front foot and keep your back on the ground.
- As you hit the ball, keep turning your hips and turn on your front foot.
- Hold your back foot down as long as you can before lifting it and rolling onto your toes.
- Let your arms move towards the target, fully extended and pointing your club in that direction.
- Keep your eyes on the ball as you finish your follow-through, and stay in your finish position until the ball hits the ground.
During the follow-through, they don’t fully extend their legs, which can limit power and distance. Another mistake is not keeping your balance and stability, making you wobble or fall. Also, you can lose power and accuracy if you move your weight too far back onto your back foot during the follow-through. To avoid these mistakes, maintain good posture and balance throughout the swing.
Conclusion
There are many moving parts in a golf swing, all working together to hit the ball. The perfect golf swing requires practice, patience, and attention to detail.
Following the step-by-step guide in this article, you can improve your swing, get more power and accuracy, and play more consistent and fun golf.
It can be challenging to perform this complex process without learning every step of the golf swing. When you have a firm grasp how the body parts in each part of the golf swing, you’ll be better equipped to correct common swing flaws and raise your game to new heights.
Although there is a lot to consider, it is best to take things slowly and reread the article to refresh your memory and fill in any gaps.

